
Garter Tab

For my new design "Ode to Claire" I want to knit a triangular shawl top down, i.e. from top to bottom. The Garter Tab cast-on is ideal for this, in which the triangular scarf is knitted on from the long middle. It's actually quite simple, I didn't know it before either.
Cast on 2 stitches, knit garter stitch (knit every row) for the number of rows specified in the pattern (10 in my pattern).
Don't turn this little stitch tail over, but rotate work 90 degrees clockwise, so that the left side of the strip is now on top, and the two stitches on the right needle are now to the right. Now pick up and knit the required number of stitches (5 in my pattern) evenly spaced along the side edge - ideally pick up into the purl bumps at the edges of the garter ridges.
Rotate work again so that cast-on edges is now on top, and picked-up stitches are now on the right. Pick up and knit a stitch in each cast-on stitch, 2 stitches total.
Now we have a completed garter tab with 9 stitches on the needle.
Knitting with Beads


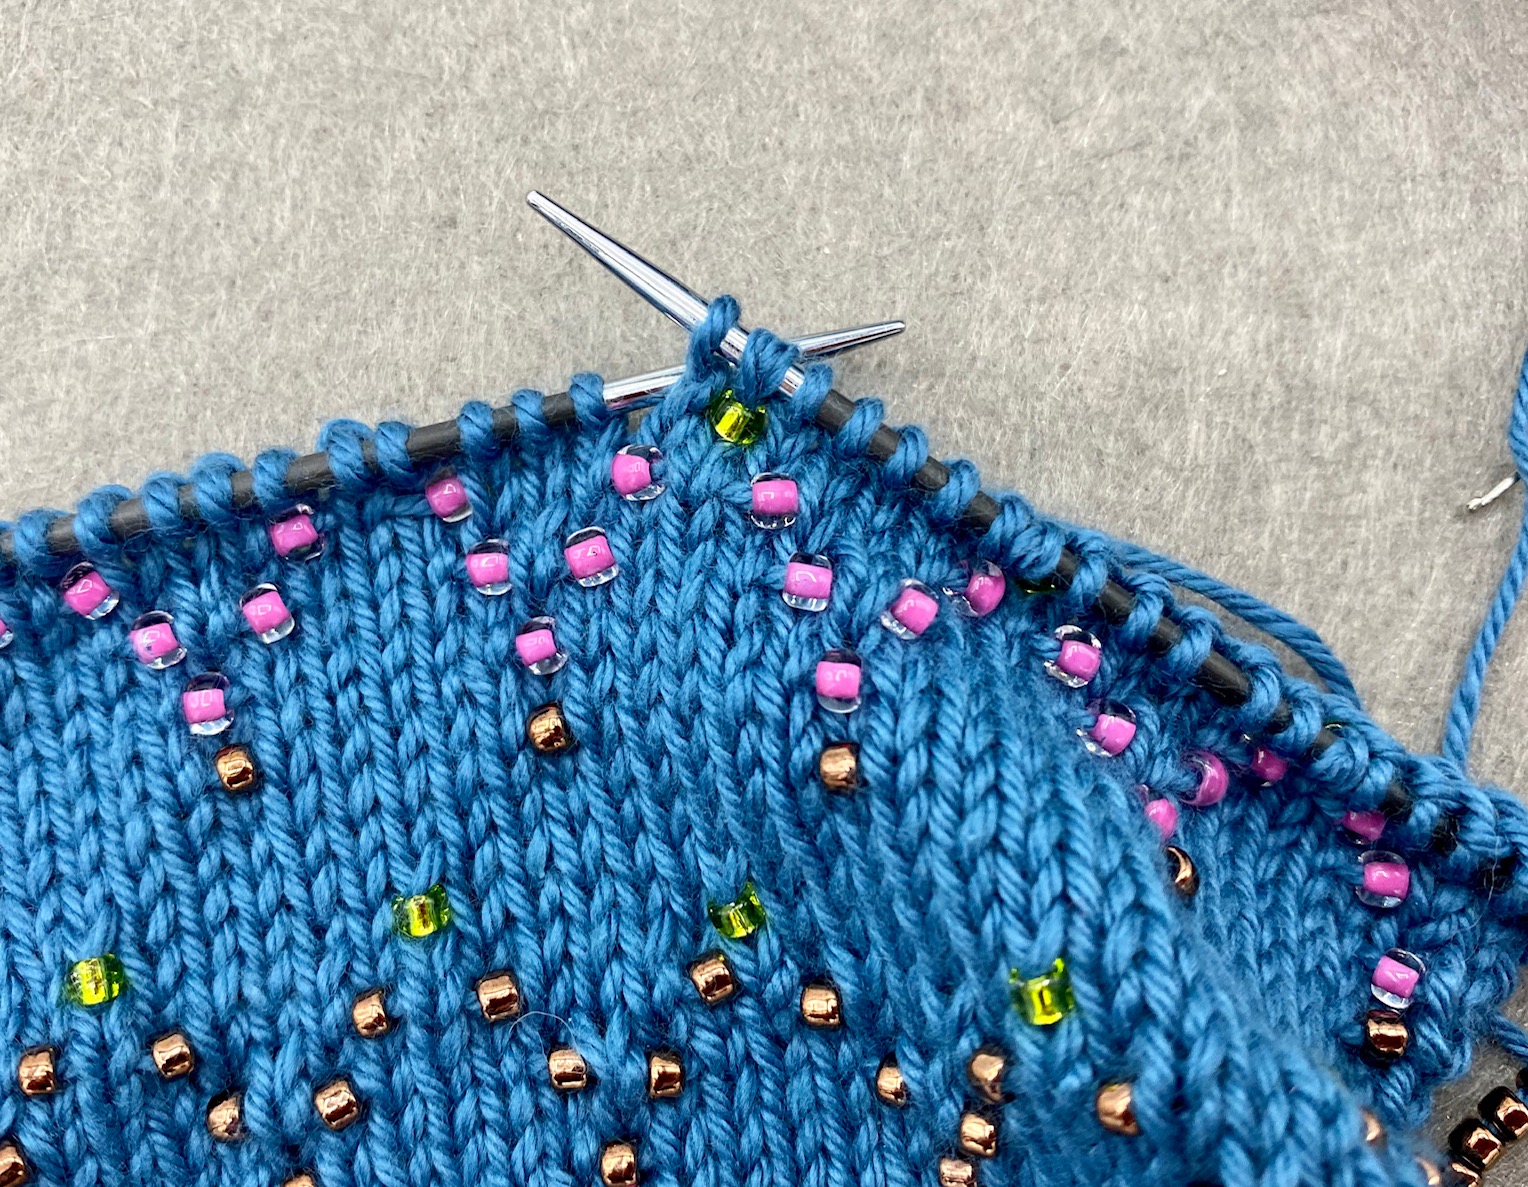


Embroidered beads or sequins are giving your knitted projects a special touch of elegance. And the variations offered in the internet are making the right decision really difficult. It is important to check if the beads are water-resistant so that your favourite scarf does not come out with a different colour after washing. Size is also important so that you can work them in according to the thickness of the yarn and also the weight for avoiding of pulling down your knitwear.
But this is not about the beads but how do I get them into the scarf. There are actually just two methods:
1. Slip-stitch method
For me the simplest and most practical method. You just need to pre-thread your beads before casting on (maybe a few more then you really need to be on the safe side in case you are not working after a special pattern). Thread a fine sewing needle with sewing thread and knot the two ends together. Pass the end of the yarn through the loop of thread so that it folds over on itself. Pick up a few beads onto the needle, slide them over the thread and push them firmly down onto the yarn. Repeat until all beads you need are on the yarn. Remove the yarn from the loop of thread and slide all of the beads towards the ball. Now you are ready to cast on. See pics on the left side. For placing the bead on right-side and wrong-side rows: With yarn on the right side of the work, slide a bead up the yarn, slip the next stitch purlwise, then if necessary bring the yarn between the needles to work the next stitch, leaving the bead at the front of the work.
2. Hooking-in method
With this method you are a bit more flexible as you don´t need to think about how many beads you need before casting on. To hook in a bead using a crochet hook (0.75mm max size) on a right-side and a wrong-site row, put a bead on the hook, slip the stitch onto the hook and then pull the stitch through the bead, taking care not to split the stitch (I got crazy about that when I did it with a double thread.....). Slip the stitch back onto the left-hand needle taking care not to twist it, knit or purl it tightly so that the bead sits neatly on the stitch.
Slip-Stitch Method
| Pro´s | Con´s |
| All beads are there right when you need them. | You always need to slide the beads towards the ball. |
|
All beads are directly in the right order in case you are following a pattern. |
Sliding the beads could affect the yarn. |
Hooking-in Method
| Pro´s | Con´s |
| No pre-threading. You can hook in the beads spontaneously. | Beads need a special size for fitting on the crochet hook. |
|
You can see the beads from both sides. |
You need to have or buy a crochet hook. |
| Are you a knitter on the go you would need to carry the beads with you, too. |
Short Row Shaping

Could be used
- to shape shoulders,
- custom fit the bust area
- as a design element such as staggered stripes.
Short Rows – puh, I gave it a try some months ago and before I did a lot of research in the world wide web about how to do short row knitting. Endless variations…….please let me know in case I forgot one….
Short rows – Yarn Over Method:
In this method, the turning yarn is positioned on the needle when the work is turned, and is in place to work together with the next stitch on the next row.
Work the required number of stitches to the turning point (knit if a right-side row; purl if a wrong-side row), turn the work, and make a yarnover. if the knit side is facing; work a yarn forward if the purl side is facing.
Closing the yarnover gap:
Gap follows yarnover: Work to the yarnover, then proceed as follows:
Wrong (purl) side facing – knit stitch follows: K2tog
Right (knit) side facing – knit stitch follows: Ssk
Wrong side facing – purl stitch follows: P2tog
Right side facing – purl stitch follows: Ssp
Gap precedes yarnover: Work to one stitch before the gap, then proceed as follows:
Right side facing – knit stitch follows: Ssk
Wrong side facing – knit stitch follows: K2tog
Right side facing – purl stitch follows: Ssp
Wrong side facing – purl stitch follows: P2tog
Wrap and turn method:
That´s one of the most common methods of short row knitting. The turning yarn is wrapped around the first unworked stitch. The way the stitch is wrapped depends on whether the knit or purl side is facing.
Japanese Method – Mark the turning yarn
Pretty similar to the yarnover method with marking the turning yarn with a removable marker such as a split-ring marker, safety pin, or waste yarn. As it uses less yarn than the preceding methods, it is ideal for working short-row heels and toes on socks. Work the required number of stitches to the turning point, then turn the work. Place a marker on the turning yarn. When it’s time to close the gap on a subsequent row, slip the stitch immediately before the turning yarn, pull up on the marker and place the turning yarn on the needle, then transfer the slipped stitch back onto the left needle, and work the turning yarn together with the next stitch as described for the yarnover method.
Catch Method
There are two ways for knitting short rows using this method. For both methods, work the required number of stitches to the turning point, then turn the work.
Method 1:If the purl side is facing, slip the first stitch purlwise with the yarn in front; if the knit side is facing, slip the stitch with the yarn in back. When it’s time to close the gap, pick up the stand of yarn below the slipped stitch, and work it together with the slipped stitch as for the yarnover method.
Method 2 (easier to close the gap):Slip the first stitch purlwise while holding the working yarn over the needle (instead of in front or back of the needle), effectively executing a yarnover. Close the gap as for the yarnover method.
If you look into Youtube for Eunny Yang you will find a good video with some explanations around short row shaping.
Slip Stitches

I don´t know why but I just like them and they are so easy to knit – really good for beginners and you can create nice patters with less effort, with one or more colours.
A slip stitch is a stitch that you don´t knit but just slip from one needle to the other. Depending on the pattern you Je nach Anleitung sticht man in die Masche wie zum Linksstricken ein und hebt die Masche von der linken auf die rechte Nadel. Man kann auch wie zum rechtsstricken einstechen, dann wird sie aber nach normalem stricken in der Folgereihe zur verschränkten Masche. Generell kann in der Folgereihe eine Hebemasche links oder rechts gestrickt oder aber auch erneut einfach abgehoben werden. Then you should knit a bit loose so that you have enough thread as buffer
Very nice (and really professional but easy to knit) are slip stitch pattern with two colours. The colour change is always after two rows and depending on the pattern you just slipt the stitch instead of knitting it. I won´t dig deeper into it here, as it might be to confusing. Just give it a try.
Kommentar schreiben